前情提要
-
感謝 毛哥EM 分享的「把 GitHub Pages 從 /repo 變成 /a/b:用多個 Repo 管理同一個網站的子路徑」,讓我知道原來 GitHub Pages 可以這樣嵌套!
-
下午和今年 SITCON CAMP 開發組的組長 Yoru 線上面談完,最後我提問了關於為何 SITCON 不是將專案和看板都放在 GitLab 上,那在談論過後我就跑來研究這個東東了!
然後~推薦大家去參加 SITCON 年會歐~下面進入正題!
大致原理
因為 GitLab 不能像是 GitHub 一樣使用別人做好得 workflow 去運行,所以我使用了大量 Git 操作,若有其他實現方式也歡迎來信討論! w@noefly.cc
接下來會走過以下步驟:
- 新增兩個 GitLab 專案
- 設定子網站
- 設定主網站
那麼開始吧~
新增 GitLab 專案
前往 GitLab 網站
https://gitlab.com
登入或建立 GitLab 帳號
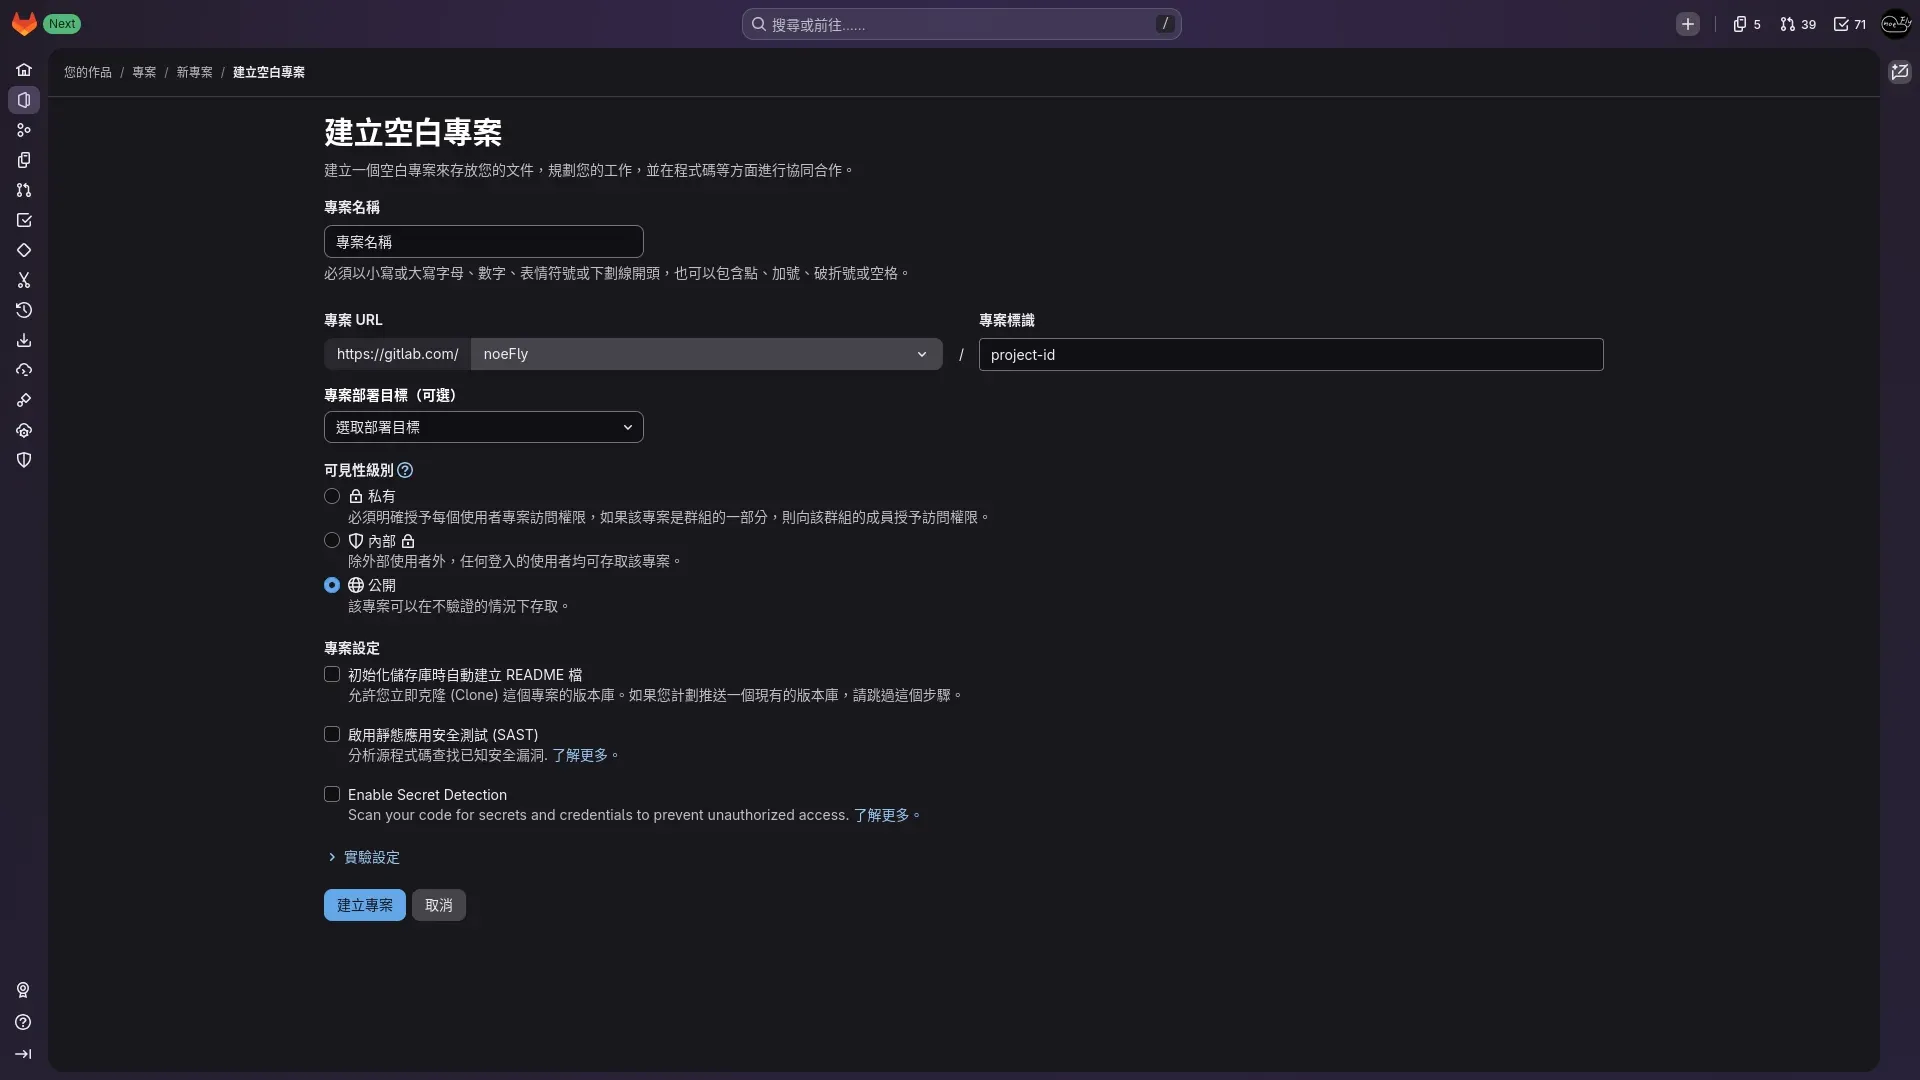
建立兩個專案
https://gitlab.com/projects/new
- 選擇「建立空白專案」
- 填寫專案資訊:
- 專案名稱: 可以隨意取你喜歡的名字。
- 專案 URL: 選擇自己的帳號名稱或是預計要部署的團隊名稱。
- 專案標識: 專案的 ID,同個帳號或團隊內不可重複。
-
若是建立 「子網站」 的專案,可以隨便取,因為後續我們只會用主網站的專案做網站部署!
-
若是建立 「主網站」 的專案,這個專案標識就會是網站的一級路徑,所以建議使用易辨識或是簡單的單字與短語。
例如「neko」,則最後成果的網址會是:「
https://noefly.gitlab.io/neko/...」。
-
- 可見性級別: 設定為 「公開」,除非是付費版本的 GitLab 或是自架的 GitLab 實例,否則有限制不公開專案無法架設 GitLab Pages。
- 重複以上動作,建立兩個專案!
設定子網站
新增 GitLab CI 設定檔
在專案根目錄新增 .gitlab-ci.yml 檔案,設定 GitLab CI。
在子網站的專案中,我會將網站建構為靜態網站後,生成的檔案輸出到 deploy 分支中。
將靜態網站的檔案放在 dist/ 目錄下,並使用下列 CI 設定檔。
stages:
- push
push:
stage: push
image: alpine:3.23
script:
- apk add --no-cache git
- cd dist
- git init
- git config --global user.name "GitLab CI"
- git config --global user.email "ci@gitlab.com"
- git remote add origin "https://gitlab-ci-token:${CI_JOB_TOKEN}@${CI_SERVER_HOST}/${CI_PROJECT_PATH}.git"
- git add -A
- 'git commit -m "chore: ${CI_COMMIT_SHORT_SHA}"'
- git checkout -B deploy
- git push --force -o ci.skip origin deploy
rules:
- if: $CI_COMMIT_BRANCH == "main"請修改下方 build 階段中的 script,讓你的框架生成靜態網站檔案。
stages:
- build
- push
build:
stage: build
image: node:24
script:
- npm ci
- npm run build
artifacts:
untracked: true
when: on_success
access: all
expire_in: 3 day
paths:
- dist/
push:
stage: push
image: alpine:3.23
dependencies:
- build
script:
- apk add --no-cache git
- cd dist
- git init
- git config --global user.name "GitLab CI"
- git config --global user.email "ci@gitlab.com"
- git remote add origin "https://gitlab-ci-token:${CI_JOB_TOKEN}@${CI_SERVER_HOST}/${CI_PROJECT_PATH}.git"
- git add -A
- 'git commit -m "chore: ${CI_COMMIT_SHORT_SHA}"'
- git checkout -B deploy
- git push --force -o ci.skip origin deploy
rules:
- if: $CI_COMMIT_BRANCH == "main"設定 GitLab CI 存取權限
因為在上面的 CI 中,使用了「CI_JOB_TOKEN」這個變數,用 CI 的工作令牌讀寫專案,而 GitLab 預設關閉了這個權杖寫入專案的權限,所以我們要去打開!
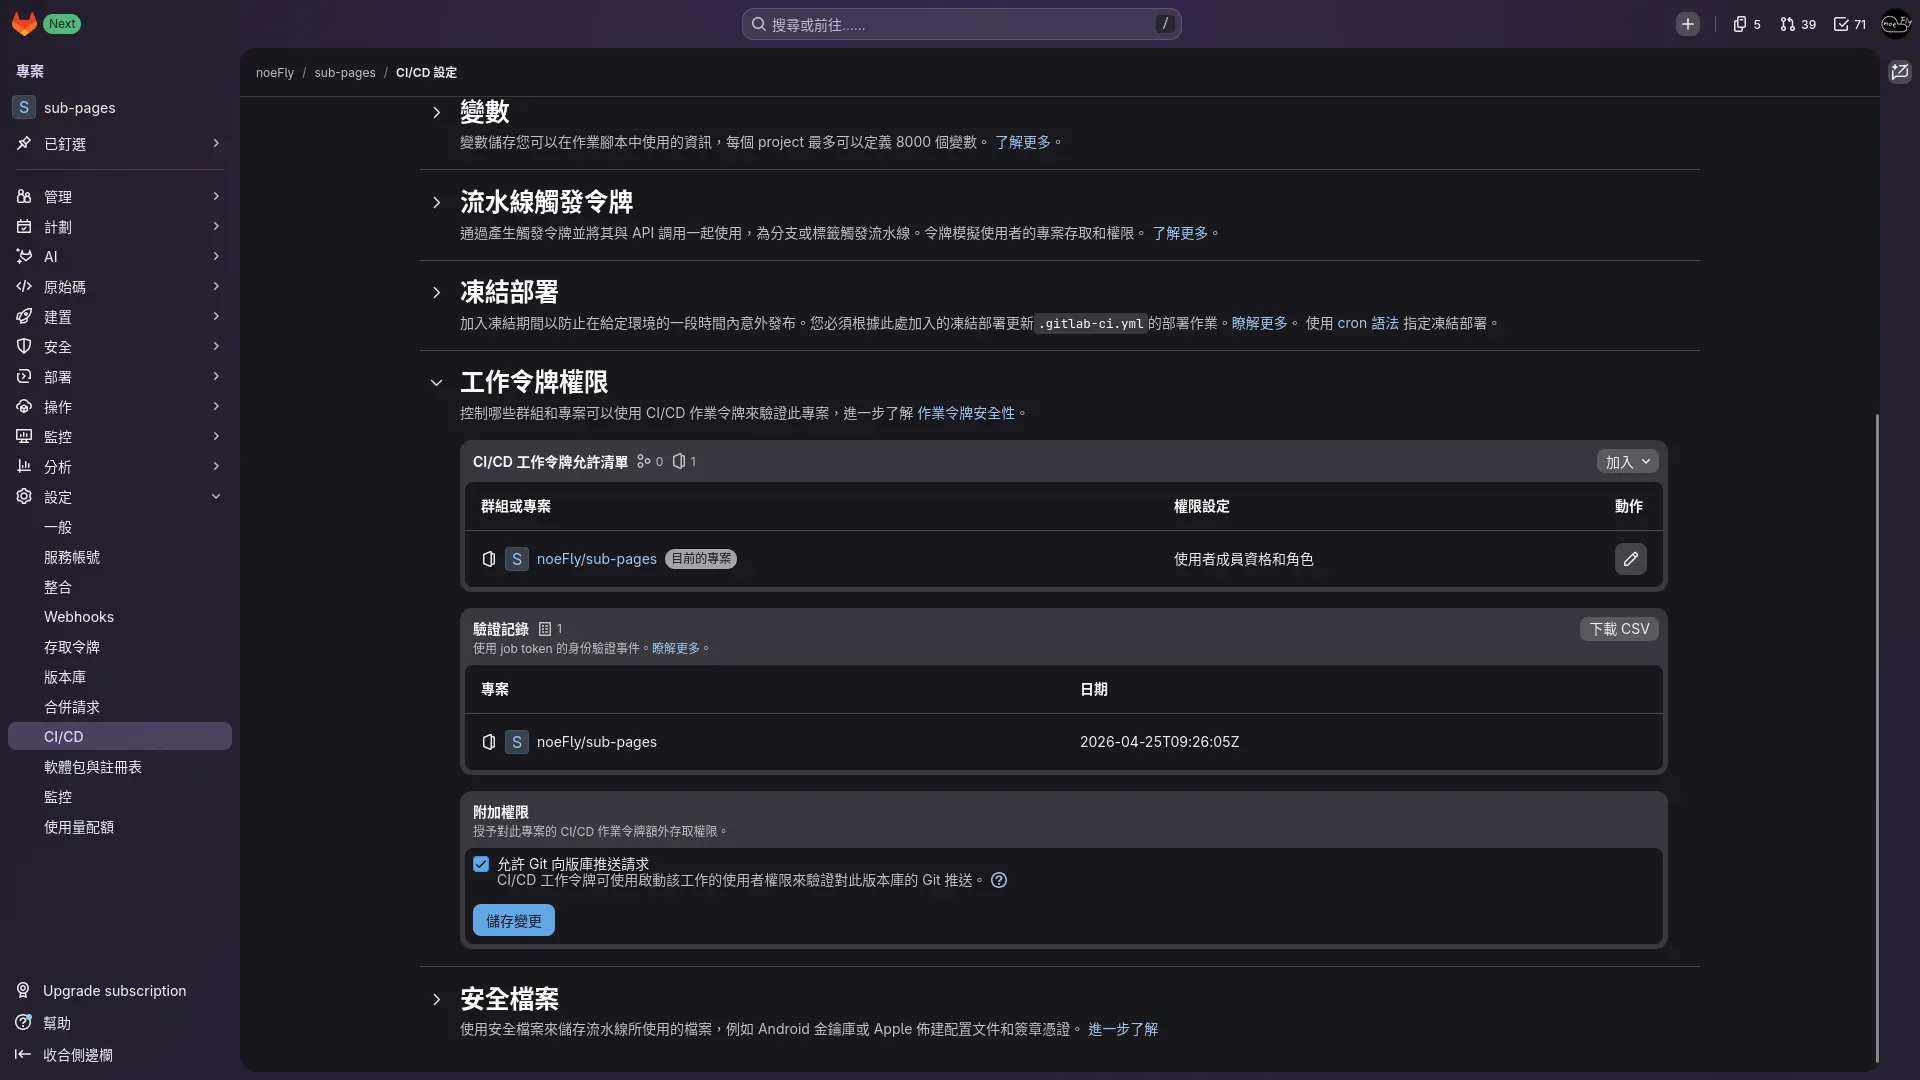
設定 → CI/CD
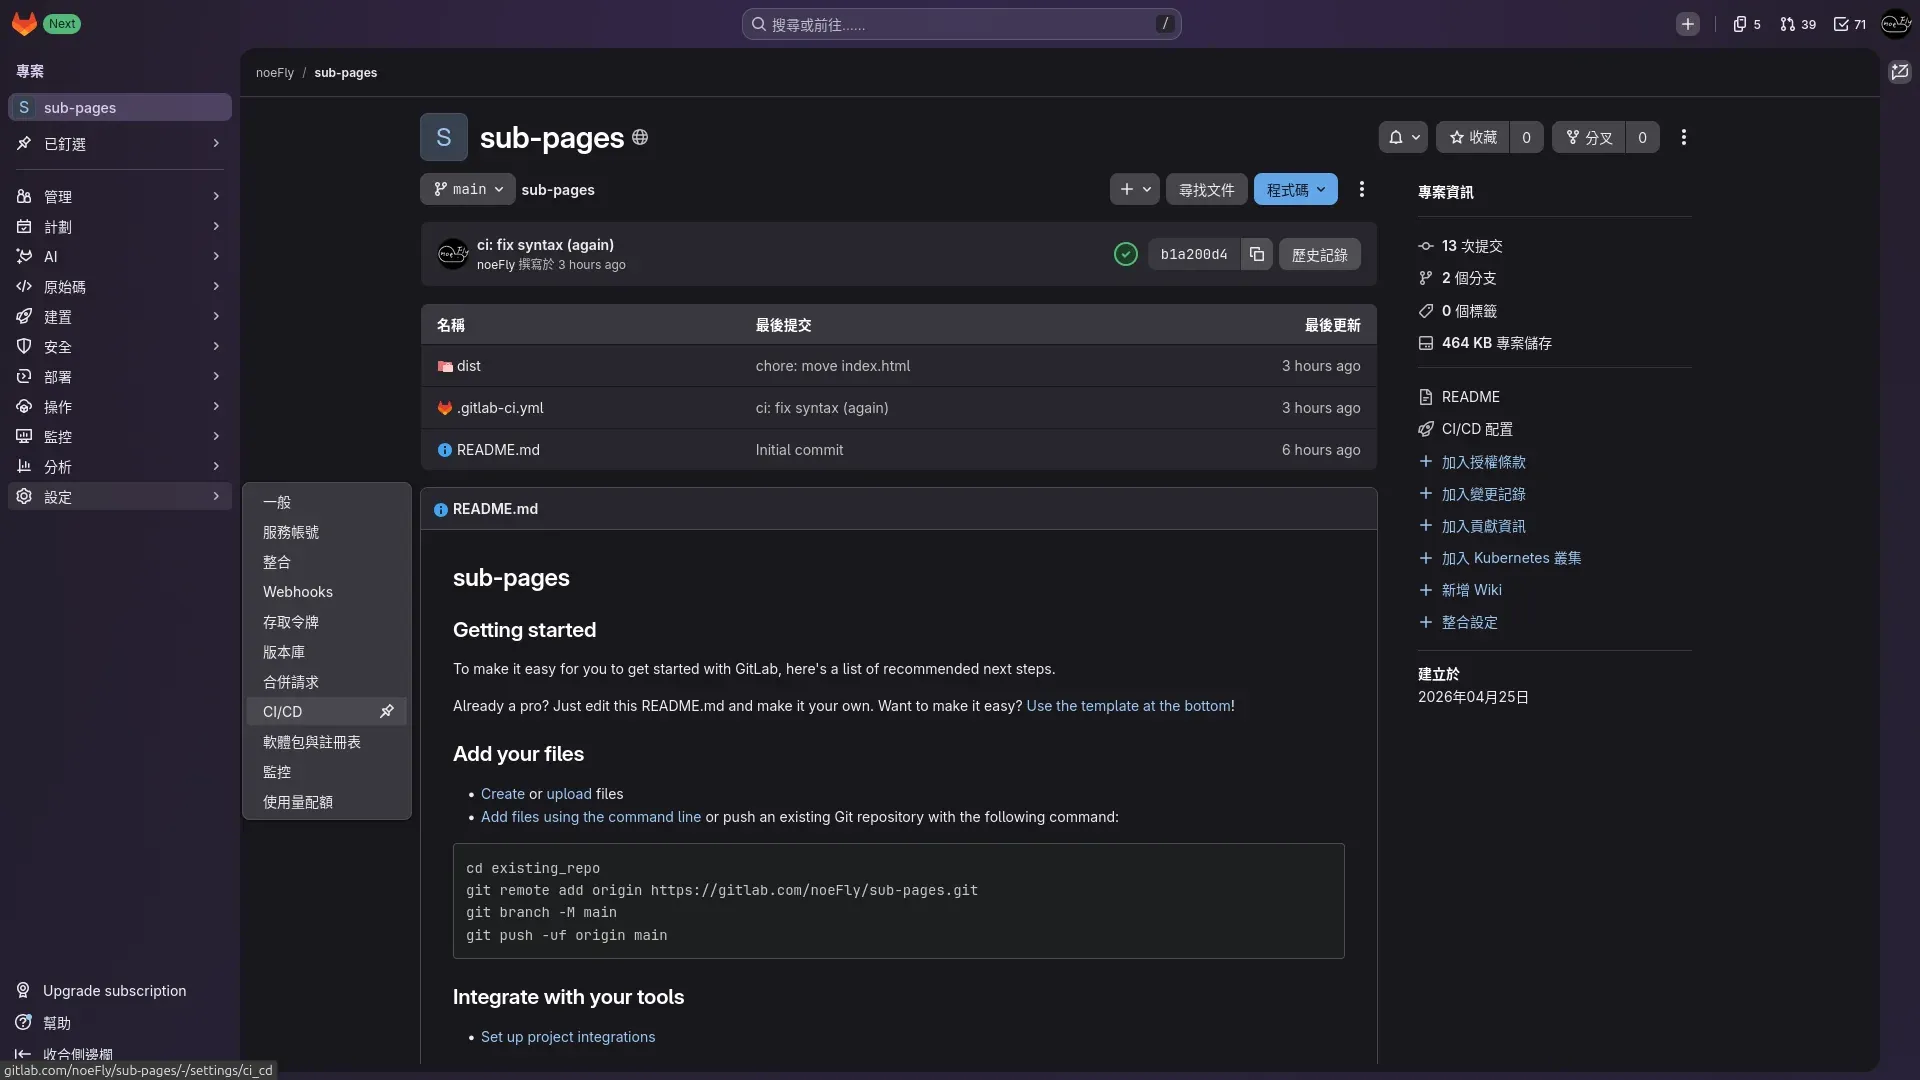
工作令牌權限 → 附加權限
✓ 允許 Git 向版本庫推送請求
~~雖然但是,版庫是什麼?~~

設定主網站
前往專案目錄
接著前往主網站的專案,我們將以 Git submodule 的方式,將子網站專案的靜態網站檔案,可以「匯入」進主網站!
cd /path/to/project
新增 submodule
這裡拆解一下這句指令的意思:
-
-b deploy:指定預新增的專案分支為deploy。 -
<project_git_url>:這裡請替換為子網站專案的 Git URL,你可以在專案的 GitLab 頁面上找到!以 GitLab 官方實例來講,格式會是:https://gitlab.com/<user>/<project>.git或git@gitlab.com:<user>/<project>.git
-
public/<path>:這是 submodule 要設定的路徑,請將<path>替換成你想要的二級路徑。 例如「ciallo」,就會變成:https://user.gitlab.io/neko/ciallo/
git submodule add -b deploy <proect_git_url> public/<path>
設定 CI 設定檔
到最後了!加油!
在主網站專案的根目錄新增 .gitlab-ci.yml:
將靜態網站的檔案放在 dist/ 目錄下,並使用下列 CI 設定檔。
variables:
GIT_SUBMODULE_STRATEGY: recursive
GIT_SUBMODULE_FORCE_HTTPS: "true"
stages:
- pages
pages:
stage: pages
image: alpine:3.23
script:
- mv dist/* publish/
artifacts:
untracked: true
when: always
access: all
expire_in: 3 day
paths:
- publish
publish: publish請修改下方 build 階段中的 script,讓你的框架生成靜態網站檔案。
variables:
GIT_SUBMODULE_STRATEGY: recursive
GIT_SUBMODULE_FORCE_HTTPS: "true"
stages:
- build
- pages
build:
stage: build
image: node:24
script:
- npm ci
- npm run build
artifacts:
untracked: true
when: on_success
access: all
expire_in: 3 day
paths:
- dist/
pages:
stage: pages
image: alpine:3.23
dependencies:
- build
script:
- mv dist/* publish/
artifacts:
untracked: true
when: always
access: all
expire_in: 3 day
paths:
- publish
publish: publish結語
~~啪機啪機!恭喜,你撐到了這裡!~~
整個流程到這裡就結束了!當然如果你需要新增多個子網站,也是可以重複以上步驟讓主網站有多個 submodule!
參考資料
- https://emtech.cc/p/repo-subpage
- https://gitlab.com/pages/plain-html
- https://docs.gitlab.com/ci/runners/configure_runners/
- https://docs.gitlab.com/ci/runners/git_submodules/